Behind the Scenes: Photomodelling
In the “Behind the Scenes” series, we discuss prominent techniques used in 3D design. Photomodelling is an effective workflow for producing detailed 3D background models.

Photomodelling was used to produce the buildings and dumpsters in this image.
Photomodelling is the process of projecting (“UV projecting”) a photograph onto a flat plane and then modelling the 3D details manually based off what would be the expected shape of the real photographed object.
This technique has many advantages, chief among which is the use of a photograph not only for the reference when modelling, but also as the final texture for the finished model. Photographs impart a lot of detail that would otherwise take a long time to replicate artistically, helping to increase the realism of a piece without requiring additional effort.
In the image above, additional grime was added in Photoshop post-production, but the overall texture of the building is exactly as it is in the real-life photograph. Turning the photo into a model allows for completely different lighting and scenic developments to be created in 3D.
Producing a model with the photomodelling workflow is particularly useful when modelling hard-surface boxy shapes which do not have too much “organic” flow to them. Buildings and simple machines are a classic example of this kind of shape. It is also ideal when creating low-detail, low polygon background assets for a scene, as minimal effort is required for a good return of detail.
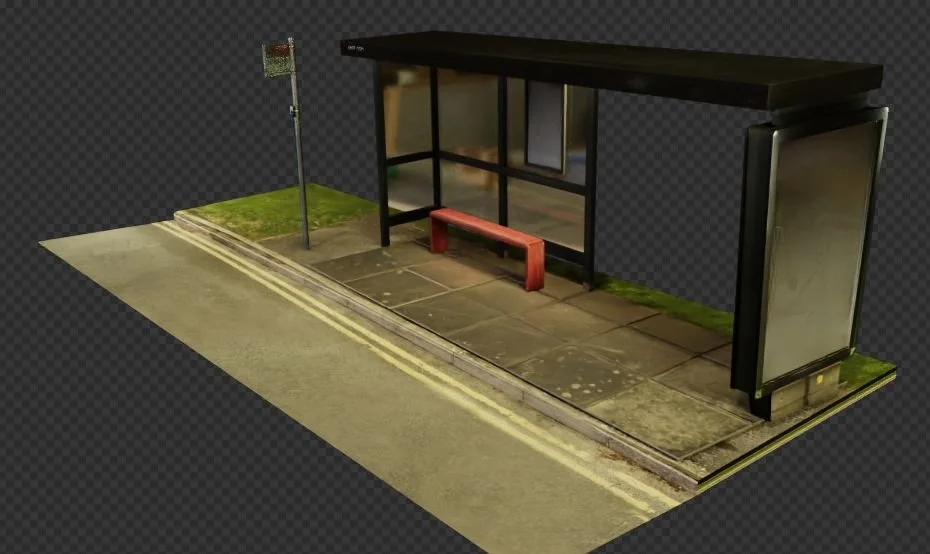
This realistic bus stop was made by combining photogrammetry ( for the road and terrain) with photomodelling.
Re-purposing the photographs to texture something completely different is known as “photobashing” and is a ubiquitous technique in modern 3D production. An example would be creating a modelled 3D robot out of a picture of some scrap metal.
Photomodelling does have disadvantages, despite all of the convenience it offers. Photographs must be captured in neutral lighting conditions, or the final model will have incorrect shadows or lighting that does not fit the environment.
The technique also tends to produce sloppy geometry that will need re-topology if intended as a serious detailed model used for advanced animation or rigging. Using photos for textures as opposed to procedural materials can also result in a noticeable lack of detail up close to the camera, if the photo is not of sufficient resolution.
This means I usually relegate photomodelling solely to creating backdrops for scenes, or for objects which can be detailed sufficiently with a single photograph. This is where it is an incredibly useful supporting technique, as to produce backgrounds through manual modelling and texturing would take so long it would quickly become impractical.
Perhaps one of the most famous online purveyors of the photomodelling technique is Ian Hubert, who uses UV projection of photos for a vast range of different high-detail projects. His short film “Hyperbole” makes heavy use of the technique to produce an extremely detailed futuristic racing track, while his series “Dynamo Dream” uses photomodelling to create entire cities filled with crowds of people.
Ian Hubert’s “Dynamo Dream” series makes heavy use of advanced photomodelling techniques
Since being popularised by Hubert, in particular his “Lazy Tutorials” series, the technique has seen a rise in use amongst Blender 3D artists in particular. Links to Hubert’s tutorial series and YouTube channel are included below, for readers who may be curious to explore the technique further themselves.
Links:
Hubert’s Lazy Tutorial Series - Excellent for beginner, intermediate and advanced 3D designers.
—
If you would like to discuss commissioning a project with MM3D, contact us today on the site.